Archive | Food RSS feed for this section

Mango and Sticky Rice – possibly the worlds most simple, most loved dessert.

6 Jan

mango_sticky_rice

Does not look like much… but wait till you taste it !!!!

Asian desserts in general have limited appeal to Westeners. Shaved ice with something resembling scarlet red Cool Aid, drizzled over it, is not particularly inspiring or satisfying. Bright flourescent coloured slithers of wormy noodles swimming in syrup, look vile and unappetizing. Then there are some odd ingredients thought of as belonging to the category of desserts. For example corn. To Westerners corn firmly belongs to a main course. To foodies and chefs, as a third rate side dish to someone’s attempt at cooking a main course. We would not (and really should not) dream of it as dessert. Corn flavored ice cream?  Urgh, it is absolutely as disgusting as it sounds.

However, there is a jewel in the abysmal combinations which makes up Thai desserts. In fact, not only is it the best Thai dessert, it is possibly the best dessert ever, elaborate Western ones included. Why Thais bothered coming up with any further, rather paltry dessert offerings, is a bit of a mystery. The unlikely combination of the sweet Mango and sticky rice makes for an superb pairing that is sublime. Once you have had it, you will instantly declare it as one of the best desserts you’ve ever had.  Honestly, its so good, it makes the existence of any other dessert redundant .

I yet have to meet someone who has not wanted to break out in Handel’s Hallelujah after the first bite. Try it if you never have, and prove me and millions belonging to the Mango and Sticky Rice fanclub wrong.

Enough selling….

Here is a video that someone made of how an authentic mango and sticky rice is served in Bangkok. This stall is literally up the road from where I live. But the video and the presenter is not me. Notice his reaction at 2:00 when he has the first bite. Its a typical reaction, no matter how many times you have had this dessert !

The only word of caution is that I would not serve it after a heavy main course. The rice is quite filling. Mango and Sticky rice would be the perfect accompaniment to an light Asian main, like a noodle dish or stir-fry.  It is not something I would serve as a desert after a 2 course meal, and if I did, I would limit the portions substantially.

Making it is far easier than most think. In fact soaking excluded, it can be ready in 30 minutes. If mangoes are not in season, or hard to obtain, use peaches, fresh or tinned, syrup excluded.

____________________________________________________________

Recipe:  Mango with Thai Sticky rice,  ข้าวเหนียวมะม่วง pronounced Khȃo Nǐaw Má-mûang

 Preparation time : 20 mins
  • 1 cup coconut milk
  • 2 pinches salt
  • 1 cup Sticky Rice ()
  • 2 tablespoons sugar
  • Optional : A few tablespoons of yellow mung beans
A choice of 2 methods : 

The Traditional Method Using a Steamer: Soak the sticky rice in enough water to cover the rice for at least an hour and even overnight. Take your steamer, put water in the bottom and cover the steam section with cheese cloth or muslin cloth. Pour the sticky rice on the cheesecloth, cover with the lid and put it on the stove on medium to high heat. The sticky rice should take about a 20 minutes of steaming to cook and will become translucent when done.

The Microwave Method: Instead of steaming it in the traditional way, you may well want to opt for the microwave method. I have not tried it myself, so further comments or suggestions on this method would be appreciated. 

Assembling: Heat the coconut milk in a pot over medium heat. Stir constantly and let thecoconut milk simmer for a minute. Hard boiled coconut milk will curdle. Add sugar and salt. Remove from heat. Pour 3/4 of the hot coconut milk over the hot sticky rice. Let it sit for 5 minutes for the coconut milk to be absorbed by the rice. The rice should be a little mushy. Spoon the rest of the coconut milk on top of the rice when the desert has been plated.

Garnish with crunchy fried yellow mung beans (recipe below) or toasted sesame seeds.

_________________________________________

Recipe : Mung Crunch : Fried (yellow) Mung beans

1/3 of a cup of mung beans
2 teaspoons vegetable oil
Salt to taste

1. Just soak the mung beans overnight. Drain them and dry thoroughly.
2. Fry in vegetable oil over a moderate heat, turning frequently, until they are browned and crisp – between 5 and 10 minutes. BEWARE : it smells like death !
3. Drain on some paper towels, sprinkle with salt, and cool. They store successfully in airtight jars.

Last word : Leftover sweet sticky rice can be put into the fridge, but needs to be warmed a little in the Microwave before serving. Cold sticky rice is simply inedible. I have heard that one could use Thai Jasmine Rice as a substitute for glutenous rice, the texture however will be very different to the sticky rice. If you have no mangoes, try peaches, fresh or even tinned.

A parking lot, a pate and how I lost my culinary chastity.

1 Jan

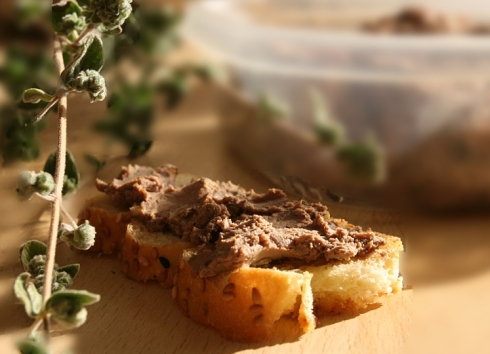
Pate

Culinary awareness happens in stages…

For Anthony Bourdain it was when, as a teenager on an ocean liner heading towards France, he found himself in what I assume a first class dining room, being served a soup. What struck him was that soup was cold. But it was also velvety thick  and within the depths of the spoonfuls of the soft beige velvet of its subtle flavors, he was moved beyond anything he had ever experienced. And so, a plate of Vissychoise brought about an end to Anthony’s culinary chaste and eventualy led him to become one of Americas great gastronomic gurus.

Though my first culinary awakening did not happen on anything as romantic as an ocean liner, I do remember it clearly. With a mom who thought Macaroni was exotic, and  therefor to be avoided, I grew up well nourished, with a somewhat limited, narrow understanding of food and its abundant varieties. For example, I never tasted mushrooms until I was in my teens. My mothers repertoire for preparing seafood was fish fingers, without mayonaise… shocking revelations for a self respecting foodie, I know.

So, with my pocket money, which was not much,
I would raid the deli counter of the small nearby supermarket
in search of all things deemed ‘exotic’.

So, with my pocket money, which was not much, I would raid the deli counter of the small nearby supermarket in search of all things deemed ‘exotic’. Plump black mushrooms, lying drowned and perfectly motionless beneath ominously looking black liquid. Soft cheeses stained with the blue green evidence of irriversible varicose veins and the unfortunate fragrance similar to the stockings my grandmother would put into the laundry basket after church.  Packets of vacuumed ham, sliced so thinly, when held up to the sun,  one could use them to watch an eclipse.

This is how my true culinary journey started.

But one day I did have very first, gastronomic epiphany. As usual, my purchase at the deli counter consisted of a lone plastic packet contained a single slice or a slither of something looking sad and lonely. Thinking back I am surprised they even went to the trouble of weighing it.

This time, I left the supermarket armed with a thin wet plastic bag containing a small soft, oval shaped ball. Waiting to get home was completely out of the question, so just there, in the parking lot, I popped the tiny ball into my mouth.

It felt like a thousand years
of culinary experiences were
unfolding in the corners of my mouth.

The first sensation was how surprisingly salty it was. But then the sensation of what I can only describe as essence of sea filled my mouth. It felt like a thousand years of culinary experiences was unfolding in the corners of my mouth. In an instant I was no longer in the parking lot of the local Pick n Pay, but basking in the warm glow of the Mediterranean Sea. Sand coloured visions of camels, dates, anchovies, ruined temples and trays of flatbreads tumbled vicariously through my head. But the lasting impression was the salty mineral filled goodness of the sea. The sea, oh the sea… I had its essence trapped right there in my mouth.

Never had I so been moved by a single bite. It was so delicious, so exotic, so moving, like consuming some forbidden fruit that would,  at once, reveal all the worlds most guarded, most seductive pleasures.  I could not believe I could buy such a sensational, almost erotic pleasure over a counter at the local Pick n Pay.

If you had not guessed it by now, I had discovered the culinary pleasure of an olive and in so doing, quite unexpectedly, and quite unprepared, lost my chastity that day in that parking lot.

The next culinary leap took place many years later whilst dining alone at a restaurant attached to a hotel I was staying at whilst on business. The epiphany was not nearly as sensational or dramatic as the one which took place in the parking lot, but it was nonetheless noteworthy.

Thanks to my taste buds being confined to a Macaroni-less childhood, I had developed plenty of daring when it came to ordering for myself from a menu. I would always go for something I had never had or even heard of before. This time it was pate. It arrived with slices of almost see through toast, a silver colored dish containing three curled and crinkled bits of butter and next to that, another curiously small dish containing the tiniest amount of jelly, I had ever seen.


What that jelly was I couldn’t tell, but it was definitely a preserve of sorts. Perhaps it was strawberry or raspberry, perhaps redcurrant. I spread the butter thinly on the cold crispy toast, carefuly layerd a veneer of  the pate and added a layer of the red preserve. The effect was absolutely sensational. The sweet of the preserves cut beautifully through the smooth, slightly salty, slightly smokey pate. It was one of those culinary experiences you remember a lifetime. I ordered that pate every time I took my place for dinner that week.

In time gone by, I have tried to recreate it several times and though I have got a close clone, it is that red preserve which has eluded me over the years.

I use strawberry jam as substitute, and its a great deal less subtle than whatever that red jelly was, but it has a similar, almost explosive effect. I subsequently discovered through writing this post, that fig is a favorite preserve to pair with pate. And so is pear.

SO here is the recipe for an excellent pate.

________________________________________

Liver Pate in less than 20 mins.

Ingredients

250g of chicken livers, at room temperature, cleaned of any green spots, washed and dried
a bay leaf
a pinch of dried thyme
a pinch of nutmeg
1/3 – 1/2 a cup of cream
2 tablespoons of unsalted butter
1 teaspoon of vegetable oil
Salt and pepper

Method
Heat the butter and oil rapidly and turn down the heat to medium high when the butter has stopped foaming
Add the livers in such a way that they do not touch one another
Add the bayleaf, thyme and nutmeg
Cook over medium heat for 7-10 minutes turning once.
You want them just beyond pink, so don’t let them stiffen too much.
[To test the correct level of doneness, bring the tip your forefinger and thumb together. Now feel the flesh between your thumb and your forefinger – thats roughly what you want to feel when prodding the livers.]

At this stage you can add a tablespoon of brandy and set it alight, then shake the pan vigorously until the flames subside. This step however is optional though it does add more dimension to the final result.

Remove the livers, but keep any liquid remaining in the pan.

If you like, deglaze the pan with a quarter cup of red wine, which you could boil down until there is just about a tablespoon left. Or simply add the cream by itself and bring to a boil whilst stirring until the mix is evenly colored. If any liquid has seeped out of the rested livers, add them to the simmering cream. Why not…

Let the cream simmer for a minute or so, then remove from the heat and let it cool slightly.

Place the livers in the blender and add the cream mix.

Blend thoroughly until the mix is silky smooth and the consistency of a thick runny porridge. Yes I know the color is rather unappetizing. If its too thick add a tablespoon or two of cream or butter.  Don’t fret if the pate seems overly thin.  It will set once it has been chilled.

Taste and adjust seasoning. It should be just slightly salty with a vague hint of thyme and nutmeg.

Though traditionaly served cold, you can have it whilst it is still warm, but not hot. Spread it on thin toast and top it with a thin layer of preserves. A good quality strawberry jam works well, but fig really works a charm.

If you feel like turning it into something a little more Downton Abbey,  could make these into canape’s by adding a thin slice of pear and a slither of gruyere cheese topped with a dot of fig preserves. Though truth be known, my dear, pate is not particularly English… even less so, a cheese with a ghastly unpronounceable French name…

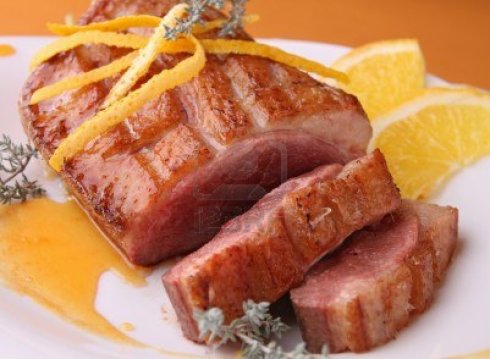
Crisp skin, succulent meat, a velvety sauce that tastes like concentrated sunshine. Its Duck l’Orange.

31 Dec

-duck-breast-with-orange-sauce

The world remembers the seventies for disco, platform shoes, ABBA, grossly patterned olive coloured crockery and as far as the ultimate culinary treat goes, Duck l ‘Orange.

Truth be known, this dish deserves a great deal more credit that the somewhat tired, stuffy seventies image it has in old dog-eared cooking books. Though it has mostly gone out of fashion, like Beef Wellington, it is poised to make a reappearance.  Well at least in our house it is..   Personally I think  duck with orange should be up there with all the other classics,  Coq au Vin,  Bangers and Mash, carrots and peas, porridge and milk.

Brief history

The idea of pairing citrus with meat stretches perhaps as  far back as pre Christian times, having its origins in the Middle East.  By the time the middle ages rolled along, it was common to pair fruit with duck, and it is known that duck with peaches was considered a standard way of serving duck in Europe in the 1500’s.  We know that duck and orange was something which was often made in Florintine cuisine, and that the Tuscan version was known as “Paparo Melarancia“.  In French cuisine, it is thought that Catherine de ‘Medici introduced the dish to France somewhere in the 1500’s  where it underwent various changes over the centuries, until, in the late 60’s, the dish became popular in sophisticated dining circles in England.  By the seventies it had gained immense popularity in Europe and America, so much that when it comes to remembering 70’s cuisine, it is this dish which was considered the ultimate in home cooking expertise.

I have made two very different versions of this over the last few months. The classic Julia Child’s Canard l’orange, and a simplified modern version and though I enjoyed both, the modern, simplified version ended up being more memorable…

The modern version,  a little like an edible Calder on a dinner plate.

VS

Duck l’ Orange from a late 60’s cookbook,  quite a conversation piece – not that I would want to be around hearing it…

Same Ingredients, 2 Methods:

Dont be fooled by the fancy French name, this dish is simple and can easily be ready in 30 minutes. Ok, 40 if you are serving mashed potatoes with it. 
____________________________________________________________

For Breasts 

  • 4 duck breasts
  • 1 tbsp olive oil
  • salt and pepper

For sauce

  • 1/3 cup sugar
  • 1/3 cup fresh orange juice (from 1 to 2 oranges)
  • 2 tablespoons white-wine vinegar
  • 1 tablespoon unsalted butter, softened
  • 1 tablespoon all-purpose flour
  • 1 tablespoon fine julienne of fresh orange zest, removed with a vegetable peeler

Start with the sauce: 

Add the sugar to a dry saucepan over moderate heat and leave undisturbed until it starts  to melt. Continue to cook stirring occasionaly until the melted sugar takes on a deep caramalised look. Dont be tempted to taste it –  its unbelievably hot, and will burst into a loud sizzle when it meets the inside moisture of your mouth.  Remove from the caramalised sauce heat and add the vinegar and orange juice, stir until the sugar is dissolved. Remove and set aside.

________________________________________________________

Pan Fried : Gordon Ramsey:

  • dry the breasts well, then lightly score the skin of the duck with a sharp knife
  • season well with salt and pepper,  add extra to skinside
  • heat the pan to medium hot, add a dash of olive oil
  • add the breasts skinside down
  • when the skin starts to release fat, turn down the heat to low
  • cook for 15 – 20 mins on low heat until the skin is very crisp and brown
  • then turn over and cook for 3 minutes on the flesh side until browned (5 if you don’t like pinkish meat)
  • Turn off the heat, remove breasts, cover in foil and let it rest 3-5 mins

Whilst the breasts are resting, finish the sauce:

Remove the fat from the pan and reserve for later useroasted potatoes, or frying anything. Its the equivalent of a culinary lottery ticket.

Deglaze the pan with the orange sauce. In a small saucer mix the softened butter with the flour until it is a paste. Now add this to the sauce whilst whisking vigorously. Add the zest and cook for 2-3 minutes over medium low heat. If it gets too thick, add a splash of water.

If you happen to have Grand Marnier or Cointreau lying around,  add a  generous splash to the sauce, once the butter paste is stirred through. You could even light it, then shake the pan until the flames subside, but be careful not to set your hair or the kitchen ablaze.

________________________________________________________

Sous Vide

Set water to 57.5 C for medium rare. By doing the duck medium rare, you will not risk overcooking the duck when it gets pan fried later on.

Season both sides with salt and pepper.
Top each flesh side with a twig of thyme
Add a 1/3 tsp of unsalted butter to each breast

Vacuum Seal

Put into the waterbath and cook for 1 –  1 1/2 hours

Remove, add the juices to the caramel-orange sauce, dry the breasts well with kitchen paper, then follow the method for pan frying, but fry skinside for 5 minutes, and flesh side for 1 minute.  Cut, cover in foil and let rest for a few minutes.

Make the sauce using the same method as above, and do so whilst the breasts are having their bath. But once they are pan fried and resting. Remove fat from the pan then de-glaze with the finished sauce. You could cok the sauce down a bit to compensate for the cooking liquids from the sous vide vacuum bag.

If you make a mash potato, this will be particulary good companion for the rich, orange infused duck.

If you have never had this dish before, you are in for a treat !

The great South African streetfood collision : How Mrs Balls and Gandhi met by accident on a plate.

30 Dec

This week a friend of ours arrived from South Africa armed with two giant jars of Ms Balls Chutney. I was thrilled. It has been years since last I have had the distinct pleasure of Mrs Balls in the  kitchen.  I started thinking about how best Mrs Balls could be utilised. A  simple cheese and chutney sandwich ?  A Durban curry ?  A Bunny Chow ? How about a lekker bazaar vetkoek ‘n mince – better known in South Africa as a Curry Bunny?

Though I cannot think of anyone I know who would actually have the nerve to serve bunny chow or Vetkoek to even vaguely respectable house guests, I plucked up courage and decided this was exactly what was going onto our dinner table for Saturday night with the visitors. The gold-rimmed plates would be filled with giant vetkoek, stuffed with authentic Durban curry, instead of the pretentious wannabe spread of la cuisine française .

Splash of History
Though there are various accounts of the origins of the Bunny Chow, it is safe to say that it originates from the Durban area, around the time of the great depression, and it was a way to have a cheap meal served in an edible container. The word bunny chow comes from Bania, (an Indian Caste), and chow, slang for chinese food.

Click to find out how to bunny chow

The first place to commercially sell Bunny Chow was the G.C. Kapitan Vegetarian Restaurant which operated in Grey Street, Durban between 1912 and 1992. Whether the bunny was invented or simply perfected there , G.C. Kapitan’s beans bunny was famous and enjoyed by ordinary people and such luminaries as Indira Gandhi and I imagine every Reddy, Govender, Botha or Smith that happened to frequent that part of town. Nowadays bunny chows have not really shaken off its peasant image, though, like pap en wors, you may well encounter it cellophane wrapped at the local supermarket, next to the foil encased pies and ready for the micro pasta dishes.

As  for Curry Bunnies, you will find these at the most greasy food counter anywhere near a train station, downtown cafe or, most curiously,  Afrikaner Church bazaar  or school fete.

Vetkoek (pronounced FET-cook) is a traditional Afrikaner ‘pastry’. It is dough deep-fried in cooking oil and either filled with cooked mince (ground beef) or spread with syrup, honey, or jam.

So the Saturday mealplan  started coming together :  Real labourer’s food eaten by really broke men (I have to confess Ive never seen a woman – rich or poor, and a bunny chow at the same table.) . Somehow our Saturday Spread would not be unlike sitting next to a chiseled farm laborer breaking for lunch after felling 12 foot high cane on a Kwazulu sugar plantation, tearing with his bare dirty hands at the crisp crust of  a fresh white bread . The bread casing is supposed to serve the same purpose as a lunchbox container and in the absence of eating utensils, theoretically this is the perfect green meal. Nothing to wash, recycle or throw away.

The curry took about 90 minutes, and in the absence of square government loaf, I compromised the bread encasement by using vetkoek. Soon enough everyone was happily tearing through the whole dripping  affair making happy eating noises.  Though I did not bother with the silverware, the gold rimmed fine bone china was definitely not going to be spared, so I forced everyone to eat from plates – Authentic green, containerless spicy peasant food is one thing,  scrubbing yellow curry stains from an egg colored  Damask tablecloth bought from a souk in Syria, quite another.

_______________________________________________________

Durban Curry (Serves 4, twice!)

(Adapted from this recipe)

  • 1 loaf bread, white, fresh, unsliced, flat-topped

Whole spices

  • 2 star anise
  • 1 cinnamon stick
  • 1 teaspoon coriander seeds
  • 1/2 cup oil
  • 2 onions roughly chopped

Fine spices

  • 3 tablespoons curry powder or marsala
  • 1 teaspoon ground coriander
  • 2 teaspoons cumin
  • a pinch of cayenne pepper / ground dried chilli powder (more if you want it hot)
  • 2 teaspoons turmeric

The meat

  • 3 tomatoes, medium, chopped
  • 1 kg meat – mutton / beef / chicken (mutton is usually used for a bunny chow )
  • 4 garlic cloves, finely chopped
  • 2 teaspoons chopped ginger
  • 3 potatoes, large, in cubes
  • 2 carrots, diced
  • a handful of peas or green beans, chopped
  • 1 teaspoon peanut butter
  • 2 tablespoons Ms Balls Chutney or any chutney (optional)
  • 1 tablespoon tomato sauce.
  • cilantro (optional)

_______________________________________________________

Directions:

Before starting, dry the meat with a kitchen towel and brown in a tablespoon or two vegetable oil. Set Aside

  1. Fry all the ingredients listed under “Whole Spices” until the onion becomes transparent.
2  Add the list called “Fine Spices”. ” Stir and fry until the spices stick to the bottom of the pot.
3  Now add the tomatoes, and stir until everything sticking to the pot bottom comes loose.
4  Add the meat, ginger, garlic.
5 Simmer for 45 mins- 1 hour, or until the meat is almost tender. (If you are using chicken skip this step)
6 add a little water, the veggies, potato cubes tomato sauce and peanut butter. (if using, add chicken) Simmer at least another 20 minutes or until meat is very tender. (add water if things start looking dry)
7 When the meat is tender,  add some chopped cilantro (dania/corriander leaves) stir through. You could also add a teaspoon of minced garlic, just before serving, this really brings out the flavor.
___________________________________
Condiments (Sambal):
Use small bowls filled with a variety of the following sambals : Chopped banana or mango, chutney, raisins, chopped cilantro/coriander, / chopped tomato and onion in a vinegar-sugar dressing (use 2 teaspoons sugar for every 2 tablespoons vinegar), dried coconut.
 ___________________________________
 Making it into a Bunny Chow :
Using a very fresh loaf  of white bread, you could cut the bread across into two, three or four even chunks, depending on how hungry the eaters will be.
Whatever you decide, with a sharp knife cut out most of the soft white bread, leaving a thick wall and bottom. Keep the bread you removed.
Ladle the curry into the hollows, and then put back on top the bread you removed. You could use this bread to help eat the curry, as “this is ALWAYS eaten with the hands”.
 ___________________________________
Making it into a Curry Bunny
Using ready made dough (bread) from the supermarket, flour your hands, tear off a chunk slightly bigger than a golfball and roll between your hands. Flatten into a disk, flour the disk well, and lay on a well floured tray. Once the dough is all used up, place the tray with the disks in a dry warm place (I use the oven.) to leaven for at least an hour. (the dough should double in size)
Heat up about a litre of cooking oil in a large pot (there should be enough oil for the disks to float freely). The oil should be fairly hot – test it by throwing in a pinched piece of dough. It should immediately bubble when it hits the oil. Using a spatula carefully lift the leavened rolls from the tray and gently lower into the hot oil. You need to be quite careful, as you do not want the rolls to deflate when getting them off the tray.  Fry for about a minute, or until the bottom turns a deep brown. Turn over and do the same on the other side. Remove to a mesh or drain on kitchen towels. Let the vetkoek rest for at least 5 mins before serving.
To serve, cut the vetkoek in half, but stop somewhere in the middle to make a pocket. Make space at the bottom of the vetkoek, and fill with the curry and various helpings of the sambalfor extra taste.
___________________________________
Something to drink please…
Though you can serve this with whatever drink you like, I got to say it goes extremely well with a ice cold sweet, but not too sweet, iced mint tea. Alternatively, tea, made the indian or english way, served strong and hot, with a cloud or two of milk.

Home made ice cream – Café Liégeois

13 May

Some time back, when I lived a Zen existence on a bed in Bangkok Noi, I vowed that, if ever I had a kitchen again, it would be equipped with every appliance and kitchen utensil imaginable. A Kenwood chef, an Italian made espresso machine, a soy milk maker, a yogurt maker, the list goes on. And years later, moving into a house with a kitchen, this is what I have. So, when I noticed that my Cordon Bleu at Home Cookbook had several ice-creams which would need to be cobbled out over its 90 lessons, I did not hesitate to buy an ice cream maker.

Setting off to do my purchase, I had a picture of a gleaming chrome and stainless steel device, in which I would stir a perfect Creme Anglaise, hit a switch and minutes later,  a soft electronic beep and blinking green light would announce it is ready for the table. So when I finally hit Verasu, Bangkok’s own Thai kitchen utensil heaven, I was surprised  to be directed to a wooden bucket with a crude electric churn. It reminded me of something Heidi’s grandchildren would use to help making butter on a crisp summers day in the Alps.  ” Put salt and ice and motor to do ice cream with auto,” the salesman announced in broken Thinglish.   “And wood very special,”  he continued, “…smell good. ”

Wow, my kitchen could do with an outdated appliance from the Alps which smells good.

Having a choice between two models  (the other one was odorless), I bought the smelly one. Though I have never heard of mahogany infused ice cream, I figured the salesman probably meant that the wood itself was of a better quality.

Though I would soon find out, quality was not what they had in mind when coming up with this device. The first time I used it, the motor broke, and a quick look at the crude designed, realised it was one of those things which were made to break. I would not bother taking it back.  On the bright side, it had a hand sling, so the device was not rendered completely useless.

Yesterday I used it for the second time (its been more than a year) and just as I was on the last minute of the 20 minute hand-churn session, the screws holding the churning part broke and the whole device sprang apart in what looked surprisingly like one of those wooden coocoo clocks coming undone in a Loony Tune Cartoon.  Furious, I decided there and then that this smell-good, rubbish butter-churner would, within the hour, be  thrown out with the rest of the trash.

No time for that now – the ice cream was done, on the verge of melting in the 40C /100F heat, so, with no time to waste, I quickly scraped out the soft ice cream from the aluminum churning cylinder, into a pre chilled ceramic bowl, and rushed the mix to the freezer before it could turn into a full blown culinary emergency. I returned to the watery mess in the lounge and started cleaning up. However,not before I ran my finger over the inners of the mostly cleaned out cylinder for a small taste of the final result.

It was absolutely sublime. Perhaps one of the best Ice Creams Ive ever had.

Greedily I proceeded to clean out the rest of the holder, and I would have happily licked out the cylinder, if only I had a 14 inch tongue that could reach its chilled corners.

I quickly put the device back together again, and tightened the many screws that had come loose during its 40 minute life cycle. I had already had a change of mind : this fragrant vintage  wooden home-made ice-cream maker was definitely a keeper.

What follows is the recipe for the superb ice cream mix. Its basically a classic creme anglaise to which instant coffee is added , cooled and then turned into ice cream.

_________________________________
Café liégeois / Coffee Ice cream Sunday

Ingredients

4 egg yolks (eggs should be room temperature before separating)
1/2 cup sugar
1 cup cream
1 cup milk
1 tsp vanilla essence
1 tablespoon instant coffee
3/4 cup black filter coffee well- chilled
coffee beans for decoration.

Method
1) Chill mixing bowl and 6 dessert glasses in the freezer.
2) Prepare the ice cream

Make a creme anglaise :

  1. Add cream, milk and vanilla essence to a heavy bottomed pot and bring to boil, cover set aside
  2. Add the sugar and the yolks to a mixing bowl and whisk at high speed until it is pale yellow, and creamy and runs like a ribbon off the whisk.
  3. Bring the milk/cream to boil again
  4. Gradually whisk in half of the milk/cream mixture
  5. Then whisk in the remainder. Whisk evenly and slowly, you do not want to end up with a bowl of froth.
  6. Prepare a double boiler : the water at the bottom should simmer, not boil, and the top bowl should not come into contact with the water below. Basically you are slow steaming the mix at the top.
  7. Image courtesy Fearless Nesting With the water simmering over medium-low heat, stir constantly with a wooden spoon until the mix starts to thicken and a trail is left when running your finger over the back of a dessert spoon. It should take no longer than 5 -10 minutes.
  8. Remove from heat, and dissolve 1 tablespoon of instant coffee into the mix.
  9. Set aside on counter to cool, stirring occasionally so that a film is not left on top.  (I stir the mix in front of a fan to cool it down quickly)
  10. When completely cooled, pour into ice cream maker, and follow the manufacturers instructions. Place in the freezer for 4-6 hours until set until firm but not hard.

Serving

  1. Using the chilled dessert bowls, pour about 2-3 tablespoons of the chilled black coffee to cover the bottom, followed by the same quantity of fresh whipping cream, pouring it over an inverted dessert spoon to prevent splashing, same as what you would for irish coffee
  2. Using a ice cream scoop dunked in warm water, scoop out the ice cream and carefully place it on top of the coffee/cream mix.
  3. Add a coffee bean or two on top of the ice cream for decoration.
  4. Serve immediately.
 ________________________
Emergency Measures: 
If for whatever reason your ice cream does not set, you could serve it as-is as a dessert as is, or if the consistency is too runny, as a dessert drink – (Dom Pedro), by  adding a a tablespoon of whiskey to it (or if you prefer, several), mixing it through, and then decant it into cognac glasses, decorating it with sprinkling of cream and cocoa, the same as you would an irish coffee. Serve as cold as possible.
 _______________
Last say :
As much as I love coffee, I do not particularly like coffee flavored cakes or drinks. However, this ice cream is absolutely fantastic. If you follow the directions above, you should end up with an incredibly smooth, superb tasting dessert. The addition of the chilled bitter coffee and cream to the bottom of the dessert bowl, ensures that the sweetness of the ice cream is controlled as you work your way through it.
Though it may seem a little simple, it is a wonderful dessert, and when faced with a dinner party, can be made a few days in advance.


Thai basil and seafood stir-fry

9 May

Looks great, and once everything is sliced and diced, takes 10 minutes to fry up.

_______________

Did I say that fried rice was the hamburger of Thailand?
Well that was a malicious lie…

_______________

Truth be known, whenever Thais are caught off guard for a food order, they would blurt out the first thing that comes to mind and to Thais, the first thing that comes to mind is something called Grapau Moo Sub. Literally translated as Basil with chopped pork.  Once you’ve had it, you will understand why it deserves the honor of being the most classic of classic Thai dishes.

Though, come to think of it,  the name does not give away much regarding the secret of why this is the standard no-brain-food-order in the land of Smiles. Chopped Pork with Basil sounds a little flat, and frankly, rather uninspiring; enough to wipe the smile off my face.  However, what makes this a palate shattering dish is the combination of copious quantities of  the three main ingredients : Basil, chilli and fish sauce.  This, in essence, is what gives the dish its signature taste.

In the following recipe I have used the essence of what I know about Grapau Moo Sub, and combined and adapted it to a recipe I found on Food Network.  Though some of the ingredients may be a little unorthodox (I cannot recall ever eating basil with mint in any local Thai plastic chair restaurant), I think it manages to fall squarely inside the ‘Authentic Thai’ category.

You could serve this to the first Thai that stays over for a pajama party at your house, and they would probably marvel at how closely you managed to do ‘real’ Thai without ever setting a toe in Thailand. Wanna really blow off their flip flops ? Add a fried egg and smatterings of extra chilli and serve it for breakfast.

____________________________

Ingredients :

3 tablespoons soy sauce
2 tablespoons fish sauce
4 tablespoons brown sugar
1 heaped teaspoon cornflower
3 tablespoons vegetable oil
4 cloves garlic, chopped fine
1 heaped tablespoon grated or finely chopped fresh ginger
2 chopped regular chillies – the length of your ring finger – one red, one green
1 pound medium- large shrimp, (lets call it 12) peeled and deveined
250g fresh calamari or squid cut to bitesize
1 medium onion, roughly chopped (about one inch diced)
1 medium yellow pepper, seeded, cut to 1-inch dice
1 cup cherry tomatoes, measured, then halved
1 cup fresh basil leaves, torn, or if you are not measuring , a generous handful
1/2 cup fresh mint leaves, torn
1 tablespoon freshly squeezed lime juice – substitute with lemon juice if you have no choice, but use 2 tablespoons instead

Method

  1.  Do all your cutting, slicing and dicing beforehand
  2. Add soy sauce and cornflower to a small bowl and mix until cornflower has dissolved, add the fish sauce and sugar, stir through
  3. Heat 2 tablespoons of the oil in a heavy bottom pan until very hot
  4. Add the chopped chilli, garlic ginger and fry briefly until you can smell the aroma (around 30 seconds)
  5. Add the shrimp and squid/calamari and fry briefly until the shrimp tails change to pink – no more than a minute or so.
  6. Remove seafood with a slotted spoon and set aside.
  7. Add the remaining spoon vegetable oil and heat until very hot.
  8. Add the onion and yellow pepper and fry briefly until the onion looses its first shade of color.
  9. Add the soy / fish sauce / sugar mixture and cook further, until the sauce thickens slightly. Lets call it a minute or two.
  10. Taste and adjust for balance. It should be equally sweet and salt.
  11. Add the shrimp/squid mix back into the pan and stirfry for a further  30 seconds.
  12. Add the cherry tomatoes and mix through, then immediately remove the pan from the heat.
  13. Off-heat, add the lime/lemon, add the basil and mint, stir through.
  14. Taste and adjust for final seasoning. The dish should be equaly salt,sour and sweet, with the pungent tang of the basil and a bite from the chilli.
  15. Serve over Jasmin or Basmati Rice, accompanied by a glass of this excellent ice cold mint tea.  The sweet of the ice tea works a charm with the spicy tang in this wonderful stir-fry.

____________________________

Variation

Thai food is super versatile, so apart from the main flavoring ingredients : soy/fishsauce/sugar/chilli/garlic/basil and mint, you can use whatever main ingredients you like.

  • For example, use strips of chicken breast instead of the seafood (cook it a minute or two longer) and use any vegetable combination you like. As long as it is fresh, it would work well.
  • Let the hard vegetables  (julienned carot/broccoli/ cabbage) cook with the onion, and add the soft vegetables, like mushroom, after the onions have shed their initial white color. When using tomato in a stir-fry, it shouldn’t be cooked, as they loose flavor and create a watery mess. The same goes for the lime, mint and basil. It is never cooked, only mixed, off-heat, the moment the dish is done.
  • If you have pineapple on hand, chop roughly and add as you would a soft vegetable. No need to add the lime / lemon juice at the end.
  • You could replace one table spoon of the soy sauce with a tablespoon of Oyster sauce, if you have it at hand.
  • To make this dish even more authentic, chop up 2 chillies add them to a small serving dish, and add one or two tablespoons fishsauce, then place on the table. Your guests can help themselves if they want it a little more salty, or a little more spicy. Also nice if you want to ‘underspice’ with the chilli’s whilst cooking, allowing people to add more chilli if they so wish.
As always, your comments are really why I blog, so don’t be shy to share your thoughts. 
_______________________________________________

New Look…

9 May

Thanks to my twin, Kitchenbabble has a new look…  Personally I think it looks great – something about the low-life kitchen towel and the classy Edwardian spoon, is spot on.

As always, comments welcome.

Mint infused iced lime tea

9 May

Not counting Pepsi, the standard drink order for almost any Thai dish is Cha Manau, or Iced  lime tea.  It consists of a sweet, strongly brewed tea dust, flavored with a generous squirt of fresh lime juice, always served over copious amounts of crushed ice. There is good reason why this simple drink is what you want next to a chilli infested bowl of fried rice or green curry.

Not only is it the perfect antidote against the sauna induced tropics, the sweet of the drink offsets the heat of the chilli in the food, making it a favorite consort for even the most Royal of Thai cuisine.

It takes less than 20 minutes to make. Start to thirst-quenching finish. The reason for it being ready so quickly (as opposed to sitting in a fridge to cool for hours) will become apparent as you read through the recipe.

__________________________
MINT INFUSED ICED LIME TEA

Ingredients

large pitcher half filled with ice
1 pinch baking soda
2 cups boiling water
6 tea bags
3/4 cup white sugar
the juice of a lemon / lime,  pips removed, about 3-4 tablespoons – (optional)
lots of mint – lets call it a handful (optional)
6 cups chilled water
 
Method
  1. Sprinkle a pinch of baking soda into a pot. Pour in boiling water, and add tea bags. Cover, and allow to steep for 15 minutes.
  2. Remove tea bags, and discard; stir in sugar until dissolved.
  3. Add the lime or lemon juice and mint and leave for a further minute or two to infuse
  4. Pour the entire contents, as is, over the pitcher with  ice.
  5. Add the 6 cups of chilled  water, stir and serve over ice.

____________________

Now first off, I know you are wondering about the baking soda. How odd !  However, baking soda cuts the bitterness of the strong tea when it brews. It is of course optional, but in my opinion it is the secret which makes this recipe stand out.

The pitcher filled with ice tea will be immediately ready for drinking. I remember the first time I witnessed this seemingly counter-scientific procedure, I was on what seemed an endless bus-ride from Bangkok to Chiang Mai. I gulped with surprise. “What ?!?” I thought, as the lady poured the boiling tea onto a small hill of ice, “..are you completely coo-coo?” Smiling brightly, she handed the Cha Manau to me and I half expected it to still be scorching hot. I carefully took a tiny sip, proceded to gulp down the rest, and immediately ordered another. There is nothing in the tropics that quenches a thirst like lime iced tea. Pepsi ? Id rather swallow a chilled, wet pillow.

You can keep this cooled in the fridge for as much as 5 days – though guaranteed it wont last as long, its simply that good. Even thinned out substantially, it makes a great accompaniment to any spicy dish.  Keep the ice coming though – this drink needs plenty of it…